Monday, August 23, 2010

Lincoln logs, no...POPKEN logs


I saw some huge pieces of ancient chopped up tree near the Fiesta Supermercado a few days ago on my way to Amanda's house for dinner and had a brain wave about how cool these giant log slices would look on her patio as chairs and tables. At 11:00 at night we went in the mini to check them out...hey let's try see if we can get one in the car...well that was easy, how about another...


That was Thursday. We made plans to have people help us get some of the even bigger logs on Saturday evening. The plan involved our neighbor friend Ed bringing his truck, hiring some friendly cheap immigrant labor, and Marco translating instructions. By Friday afternoon all but the very heaviest logs that would take more than 2 normal people remained. People around here like big pieces of trees! Then Ed went to Fiesta Saturday morning, stopped to see the logs we'd told him about, got a passer by to help him load the three smallest ones in this truck, and called me up.

Well, since we're all three here with the truck we might as well try to get the others ourselves if we can...and now that we have all but the two biggest "could take 6 people" sized ones we should go to that other pile I saw and get more...

I like when fun adventure projects just flow along like this. Sometimes getting stuff done is all about planning and executing steps strategically. And sometimes you just go with the flow.


Posted using BlogPress from my iPhone

Thursday, August 19, 2010

Prepare for chickens!

Amanda and I went on the Dallas Chicken Coop Tour a few months ago and were completely convinced and inspired to have our own backyard chickens.

We decided the coop and pen need to be in Amanda's backyard because mine is too small and we live so close to each other that we can easily share the chicken duties. Now that she's settled into her house, we're ready to get going on it. We first walked around the yard and discussed the overall vision for her yard, then we figured out how the coop would fit in and how it would look.


The view from Amanda's back porch.

Then I came one evening with my trusty reciprocating saw and cleared out the back left corner of the yard, removing low lying limbs and small bushes and vines.


The dogs always get to romp together while we work. Here's Lady and Turkey playing next to my big pile of cut down limbs. The thicker branches will be saved to use an the chicken's perch in the coop.

Chickens need sun and shade as well as protection from the elements. This location is perfect for that.


While excruciatingly bored at work one day I drew up the plans. The next afternoon we made a detailed list of the supplies we needed and it started to hit me how big this project is. We need a LOT of wood.


Thankfully there were a lot of 60"ish 2x4s in the sale section at Home Depot. These are pieces that are left over from other cuts or have a chunk missing or sone defect...and are sold at $0.51 each! A steal! Perfect for us.


Here's Amanda with our very full lumber cart.


The guy that cut our wood didn't believe it was all going home in a mini cooper, so he came out and helped us load it up. Two different guys offered to take the stuff for us in their truck, which was nice I guess but at the time seemed creepy. Anyway, it all loaded in easily and the employees that had stood around watching and laughing got schooled.


Fido kept trying to hop into the car while we were unloading everything into Amanda's garage. "please can I go home now?!!" He eventually hid in front of the driver's seat by the pedals. He doesn't really like hanging out in the backyard in the heat while the other dogs do stuff like...


...create their own mud puddles where the hose is leaking.

So the prep work is all done!
Check in soon to see us build a chicken coop.

This is going to be GREAT.

Thank- Posted using BlogPress from my iPhone

Tuesday, August 10, 2010

Grout: easier on than off

This morning, 31 hours after adhering the tile to the Hardy Board, I put in grout. I'd thought about doing black but decided it might be too heavy looking. So I went with a medium grey that would be an in-between colour for my slate and white tiles. I hope I made the best choice!


I used a premixed container of grout, a trowel, a kitchen spoon, and my fingers to get it on.


Getting it off turns out to be much harder than getting it on. You just keep wiping, and rinsing out the sponge, and wiping, and rinsing... The thing is, you can't leave a film on the tile or it will dry that way and always look cloudy but the sponge seems to always grab a touch of grout from in-between the tiles and smudge it around. I ended up using the sponge to get it clean down to a thin film, then a dry dish towel to get it mostly perfect, then a dampened piece of towel around the tip of a finger to scrub individual tiles. The white ones really didn't want to come clean! It took about an hour start to finish to do the grout.


Update: the grout dried slightly darker and looks great! So, paint AND grout both dry darker. Good to know.


Now I wait 48 hours before putting on the tile and ground sealer.

In the meantime, I'm washing dishes in the bathroom. Ugh. It's worth it though.

Posted using BlogPress from my iPhone

Monday, August 9, 2010

Tiling the sink! FINALLY!!


Yesterday my Dad, Marco, and I finally got down to business on the sink. Tiling is pretty easy, but getting it ready for tile took some power tools and muscle.


This is where we ended last time. Not my Dad under the sink with a flashlight, but a basic wood frame with a huge porcelain sink in the center, washer/dryer on either and a box of tile waiting to be put on.

The tile shouldn't be applied to wood, it can warp and pop the tile off, so we had to apply Hardy Board to the sink top which meant we had to unhook the pipes from the heavy cast iron and porcelain sink to pull it out, then measure cut and screw down the Hardy board. This meant cutting the top piece the right size while wearing masks because this stuff makes seriously nasty dust...we remembered the masks after this first choking dusty cut...


...then lying it on top and tracing the hole for the sink...


...then using a circular saw and jig saw to cut out that hole using special carbide tipped blades because Hardy Board aka "concrete board" is so abrasive it dulls a normal steel blade in moments...


...then measuring cutting and screwing the front panel on with special hardy board screws...


At this point my Dad went home and Marco went to a coworker's birthday party and I spent the next couple hours (11:00pm-1:00am) laying out the tile and putting it down. It's really easy. Put down a thin even layer of concrete looking tile adhesive, put the tiles on, wiggle slightly and smoosh them into place, then wipe off excess adhesive and look admiringly at your beautiful tile. I used tile "nippers" to cut some tiles, which sucked because although it worked, it made a jagged cut. If I were doing a lot more tiling I'd look into a real tile cutter which is still less expensive -and way more fun- than hiring a professional.


I had 28 tiles left over. Pretty good estimation of how much was needed, huh?!


The adhesive has to dry for 24 hours before I apply grout. Then that has to dry for 48 hours before I can put the tile sealer on. Then after that dries I glue down the edge pieces, and then the sink goes back in. I'll keep you posted on progress!

Posted using BlogPress from my iPhone

Wednesday, July 28, 2010

Small triumph. Shelves.


I've been spending a lot of time in my design studio. I'm transitioning into sewing full time. One thing keeping me from my highest level of productivity is disorganization. Half of my closet with big mirrored sliding doors is my personal closet for my clothes (renting half the house and living+working in the other half, remember?) The half of the closet where I store sewing room stuff had few shelves and lots of wasted place where things would pile up. So I decided to put in shelves. I'd already put one new shelf in but it wasn't helping much. Here a pic. Don't be scared!


I cleared it all out including the plastic set of drawers and took measurements. The thing about making shelves is that all the walls aren't level so you have to measure each shelf in it's position. There was a 3/4" difference between the top and bottom shelf's length. My plan was to screw a 3/4" wide and 11" long piece of decorative trim (the kind you usually put around a window or door) onto the wall on each side of the shelf to support it, using scraps left from doing the same thing in the kitchen This gives me some leeway with the length of the shelves. As long as they're long enough to rest on my supports we're good.
You can see how it works in the upper right corner of this pic.


Now, measurements and plan ready, it's off to the lumber department. I always try to look like a hot construction worker when I go in. A bit rugged and casual so I look somewhat capable and definitely not a potential winey helpless girl, but still cleaned up enough that they want to try and impress me with helpfulness and might try to get my number. This is how you get perfect cuts of wood (they're not supposed to do measured cuts) at half price and get out in half the time.


Getting my shelves cut to the right size from a 12' plank.

I ended up with 2 helpers this time and got a full tutorial on putting in tile (tiling the sink is next on the house to do list) and got all the supplies to do it. Now I just need to borrow a jig saw to cut the cement board so I can start. Anyway...two helpers.


Pushing the lumber cart while being led to the tile aisle to get grout and supplies.

The next critical part of putting in shelves is using a level. My huge level wouldn't fit in the tiny closet so I downloaded an ilevel app on my iPhone.


A lot of measuring, leveling, and use of the cordless drill later, I have an organized supply closet for less than $15.


Toby helped too. He sat on the wood I was using, demanded that I throw his tennis ball, and fell asleep near by me like he always does. A good sidekick is critical for any project however small.


Posted using BlogPress from my iPhone


Saturday, July 24, 2010

The restoration-> sewing -> blogging circle of inspiration

The major difference between the big shot and the little shot is the big shot is just a little shot who kept on shooting.
Zig Ziglar


This week I got the basics of the website for my design studio finally up.

www.salvagehouseboutique.com

I've owned the domain name for at least 8 months without putting anything on it except a "coming soon" note, and in the meantime I made a blog by the same name.

I promise I'm not obsessed with the name Salvage House, but what the name means to me and how it came to me is a good story...pretty much the story of figuring out what the hell to do with myself after graduating from college.

taking my parents on a tour of the fashion design building after getting my diploma

When I graduated In 2008 the economy had started going bad. The interesting thing was, the fashion industry started going bad at least a year before it hit everything else, probably because people were already over mortgaged and deep in debt and they were pulling back a little to keep the shit from hitting the fan. Anyway, it all went to hell in the months after we got our degrees. I believe about 40 girls graduated with me, all of us getting a BFA in Fashion Design. Some of them moved to places like New York or Philadelphia to try their luck and either got chewed up and spit out or starved. A few girls got jobs. Those girls were either laid off after a few months, lost their job when the company went bankrupt, or quit after a few months because of the craziness. Many gave up and got completely unrelated jobs to pay bills or went back to school for a different degree. I know two girls who are starting their own line, one girl who does part time costume design, and one who's really successful designing for a medium sized western wear company. That's it. Oh, and me. I'm still sewing for $.

What does this have to do with "Salvage House" ? I'm getting there.

I went through a few retail jobs and a completely non fashion related job, watched the economy crash and start to smolder, and was grateful for what I had. Eventually I decided that since I was intentionally staying in Dallas and was going to probably live through a few more years of recession ( if not a full blown depression. Remember how terribly bleak it all seemed?) then I would choose to use this time to set my self up for when the economy came back. Zig Ziglar wrote in one of his books See You at the Top that a football player doesn't wait until the moment he's called onto the field to start training, he prepares long in advance so when the opportunity comes and he's called onto the field he's ready to make the most of that moment.

I decided I would pool my resources (savings account with money in it from a car accident I was in as a child, the high paying higher stress job I was in at the time, high credit score, etc.) and buy a house in an area that would develop over the next 5-10 years, then spend that time studying and practicing and build a niche business that would be ready to thrive when the economy improved.

I wanted a property I could eventually use for both residential and commercial (live in one part, run my own business in the other part. One mortgage instead of 2 rents!). It would also need to be in the most interesting corner of Dallas I could find. The house would have good bones (pipes, electrics, foundation...) but would be cheaper because of lack of care (unkept ugliness can be fixed). After hearing about the Trinity River Project and all the development planned for just south of downtown I drove down to the levees with Marco and we started cruising through all the neighborhoods south of the river slowly weaving our way further south block by block. Not too far away from the Trinity and downtown Dallas the neighborhoods got really cute. Big trees, hills, restored historic homes, scattered parks...lovely. We'd discovered North Oak Cliff.

Of course you know that almost a year later I had bought a house one block from a vibrant historic shopping district that's growing. It's in an area that is wildly diverse and was seeing housing prices RISE while Detroit was being abandoned, Vegas was almost entirely in foreclosure and mortgage insurance was impossible to get. Thankfully I had 10% down and awesome credit!!


I left my stressful job, started restoring my house, and got work at a boutique I could walk to. That was when I discovered architectural salvage. Places like like DHW, Orr Reed, and the Old Home Supply House are hired to dismantle old homes that are being replaced by gaudy mansions or just to clear out one room like the kitchen that's being updated. They carefully pull out everything that can be reused, take the rest to the landfill, then sell the good old stuff in their warehouse to people like me who give these old things new life. There are vast rooms of old doors of every size and shape, ceilings covered in clusters of light fixtures, stacks of old table legs and banisters and random pieces of carved wood, carved fireplaces, stamped tin ceiling panels, entire vintage kitchens with counter top sink and cabinets, old sinks, clawfoot tubs, vintage windows, wood floors...
a weathered door next to an aisle of old doors at the Old Home Supply House

Not only is this a great way to get historic items for a historic home, items that are generally less expensive more beautiful and better made than their modern Home Depot or Ikea version, but the concept behind it is thrilling. To take the best of the past and present, to pull it apart and save it and recreate it in a way that is relevant to a modern life. Taking pieces, bringing them together in a new way, and creating something fresh and beautiful. There are some things like silhouettes, proportions, colours... that are always beautiful. Timeless classics of design. And when you utilize classic beauty there's a little borrowed magic that comes with it. All the unconscious connections you've made with that aesthetic through old movies, life, art...and the real bits of energy that seep from a historic object that's been involved in many lives over a very long time.

A close-up of that weathered door. The worn wood grains and layers of flaking paint reminds me of some modern art.

So when I decided to start a clothing line and go into business as a seamstress specializing in vintage clothes, and I found myself needing a business name, I thought about the the past two years and what inspired me to keep going. I thought about my efforts to pull a life for myself out of the pieces left over after my industry and the entire economy crashed, the inspiration of bringing a long neglected house back to life using many bits and pieces of the past and present fueled by hope for the future. I thought about my love of vintage clothing that inspires my business and my designs...all of it was based on the same concept, the concept behind architectural salvage. It's about pulling from the best of what's come before and recreating it in a beautiful way that's relevant to now. Taking what you've got and embracing it; really running with it.
Sewing. Salvage. My house.
Salvage House.

- Posted using BlogPress from my iPhone

Thursday, July 8, 2010

Good Demolition Makes GREAT Neighbors


I've been quite honest about the fact that one of my main priorities with my house was to improve the yard and exterior therefore making the neighborhood a little more appealing therefore attracting more people like myself who want to improve their house and make a positive impact on the area. Basically, I wanted to encourage more gentrification.

I believe I have achieved my goal.


This house is exactly 1 block from me on my same street. It's got a lot of potential but abandonment and abuse have left it ugly and trashed out and it turns out it hasn't been legitimately lived in since the owner went into a nursing home 8 years ago. I say "legitimately" because plenty of unsavory folk have used it over the years. A crappy old couch on the front porch often held creepy guys doing who knows what (being lazy? Selling drugs? Who knows) the interior was everything you would visualize if someone said the words "crack den."

A few months ago I was wonderfully surprised when a sweet upper middle class couple in a nice car pulled up in front of my house and chatted with me over the fence about the area. I tried to convey to them why I love my neighborhood and the potential in it but was pretty sure they'd buy in a more gentrified neighborhood nearby, like one of our gorgeous historic districts. I was delightfully shocked a month later when they told me they'd bought this abandoned house on my street!! Turns out they're real estate investors who were planning on flipping a lot of houses in the area but are going to make the house on my block their personal new home!

THRILLING!!
It took awhile to close on the house because of title searches and other difficulties that arise when a sale involves an elderly person and her relative with power of attorney, but they finally got the keys a week ago and immediate set to work gutting the place, and this house needed to be gutted if ever a house did!
I admit, I've been spying on the house very day to see when they would start work on it. I was that excited. I was lucky enough to get a tour of the house from the new owners a few weeks ago before work had officially started and before they had even gotten the keys. This was easy because the back door has no lock. I'm not sure the door even closed all the way. Honestly, being in an actual abandoned house that was obviously used for bad things was a little disturbing. I went yesterday to check in on the demolition and loved it! So much of the creepy old house is GONE


This is the view through the front door. Eventually a curving staircase will be the view here taking you to the new second story being put into the current attic.


Here's the living room to the right of the front entry. I love how with all the dry wall removed you can see the ship lap boards that old houses from the 1920s were built with. If you took all the dry wall out of a more modern house all you'd see is a line of posts 16-18" apart, no wall at all. This type of solid old school construction is part of the reason that the old houses have lasted so long and are so worth saving. You can't see it for all the dust but there are gorgeous old hardwood floors in there too that were covered in crappy crappy carpet before.


To the left of the front door I found a friend and coworker of the owners. A moment later I heard rustling in the ceiling and a brick flew down through a hole in the ceiling towards his head. He calmy caught it and added it to the stack. Turns out one if the owners was in the ceiling taking apart the old chimney brick by brick. The mortar had become so weak and brittle over 80+ years of smoke and heat that it was crumbling apart.

Did you notice the crazy high ceilings? Like, 12 ft?

You can see in this photo how, when they took down the dry wall from the ceiling, they found out that ceiling was floating a few feet below the real ceiling. Creating a lower false ceiling was probably an effort to save heating costs since heat rises and hot air 12 feet above the floor does nothing to keep a person warm. Modern AC systems and our knowledge of how to control air circulation make that less of a problem, so my new neighbors now have gorgeous high ceilings that I love. Imagine the chandeliers they can use!

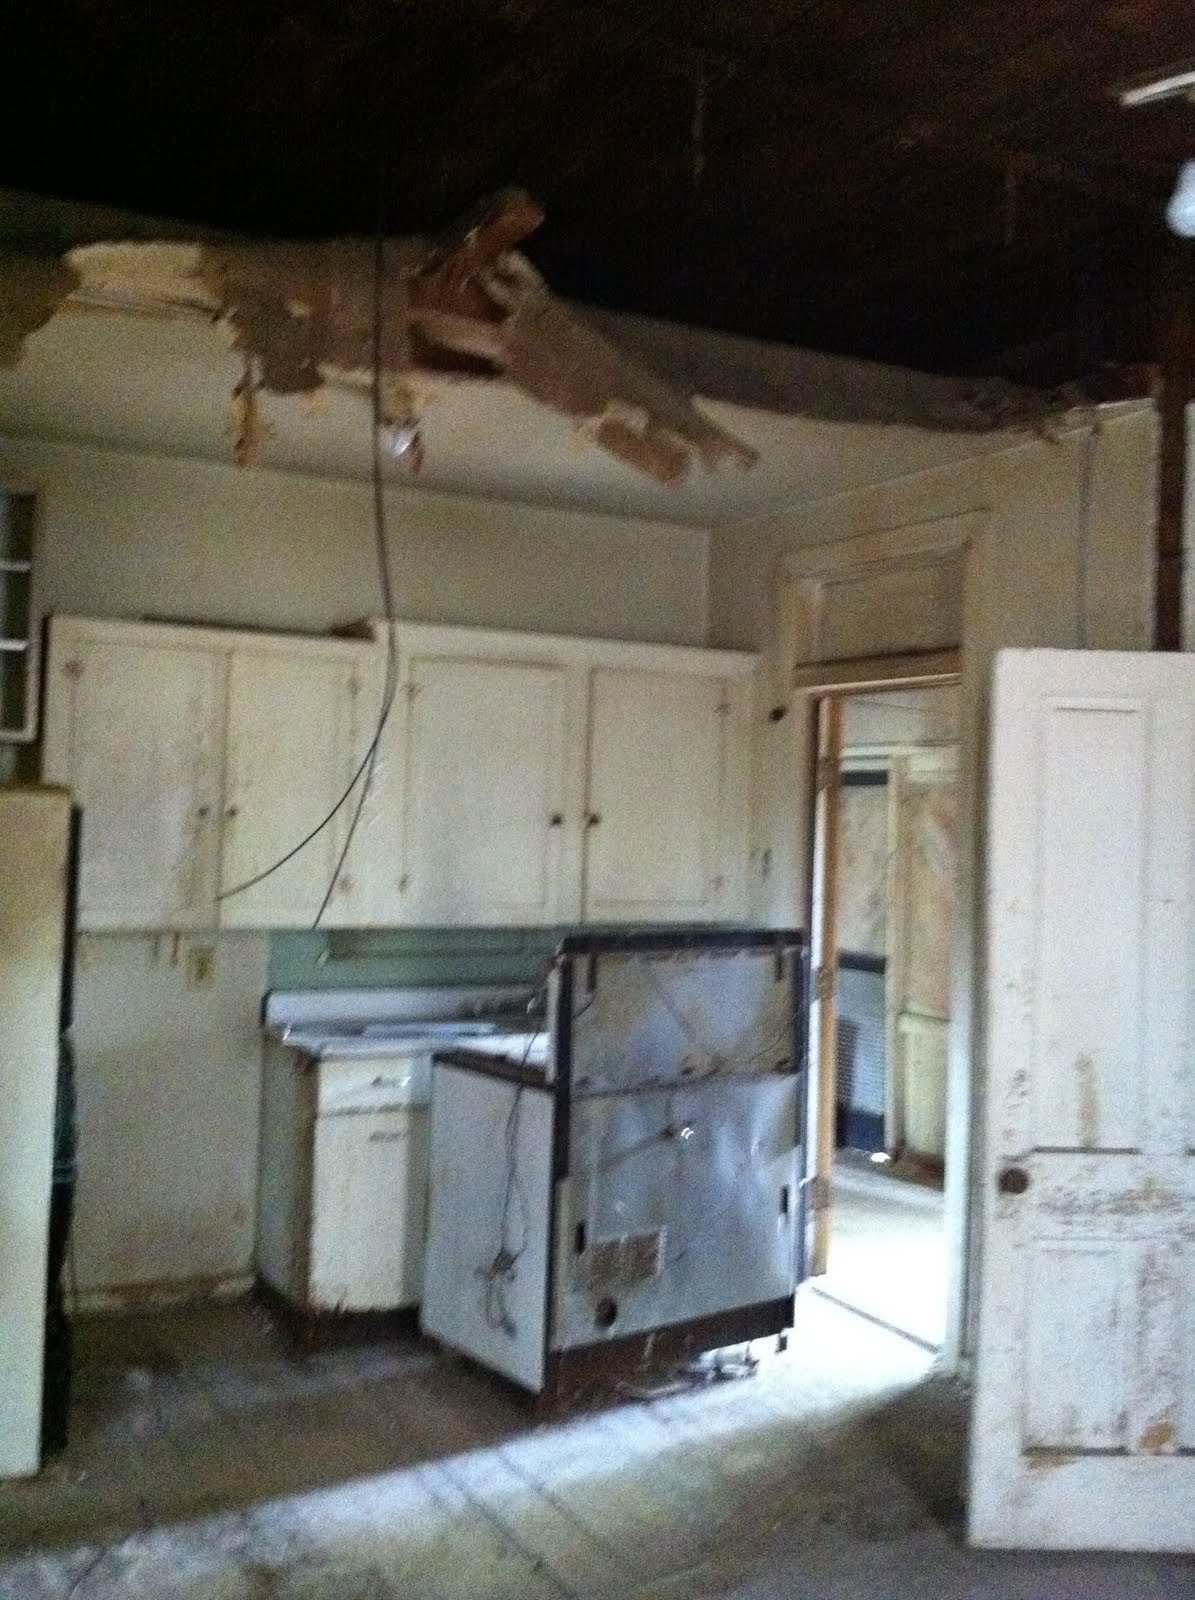
The old kitchen, by the way, has the coolest old appliances still in it.

Check out this ancient stove


Vintage fridge
(see how filthy it is? The walls and ceiling looked like that. Ew.)


I call dibs on this huge old porcelain sink if it gets given or thrown away! More likely though my smart new friends will sell it for $$$. These old sinks are worth a LOT, which is the only reason I don't have one already.

My favorite thing about touring this house during demolition was seeing the layers upon layers of cool old wallpaper and linoleum.


But I think my very favorite thing about all of this is that money, loving attention, and general improvements are coming to my street, and it's not in the form of "tear it all down and build brand new" developers. Instead it's very cool people who love historic houses and know how the get things done right. I think they are so lucky to get to not only buy a cool house in a cool neighborhood that's blossoming, and not only to be able to bring an old building back to life (which is way fun!), but to be able to concurrently wipe out a black spot from a neighborhood and turn that void of potential darkness into a beacon of light and hope and growth. That must feel GREAT. It's already pretty great just watching it from down the block.

I can't wait to update you as things progress on my street!!!!


Written with BlogPress from my iPhone <---see this cool automatic note? Not only are all these great photos thanks to my NEW iPhone 4 but the blogging is on my phone too! So cool! It's all getting better from here on out!